
Crispy Hash Browns: The Goal
The pursuit of the perfect hash brown is a surprisingly complex one. We all have a vision: a golden-brown exterior giving way to a fluffy, tender interior. Achieving that ideal texture, however, isn't as simple as just grating a potato and throwing it in a pan. It demands attention to detail, and a fundamental understanding of what makes a truly exceptional hash brown.
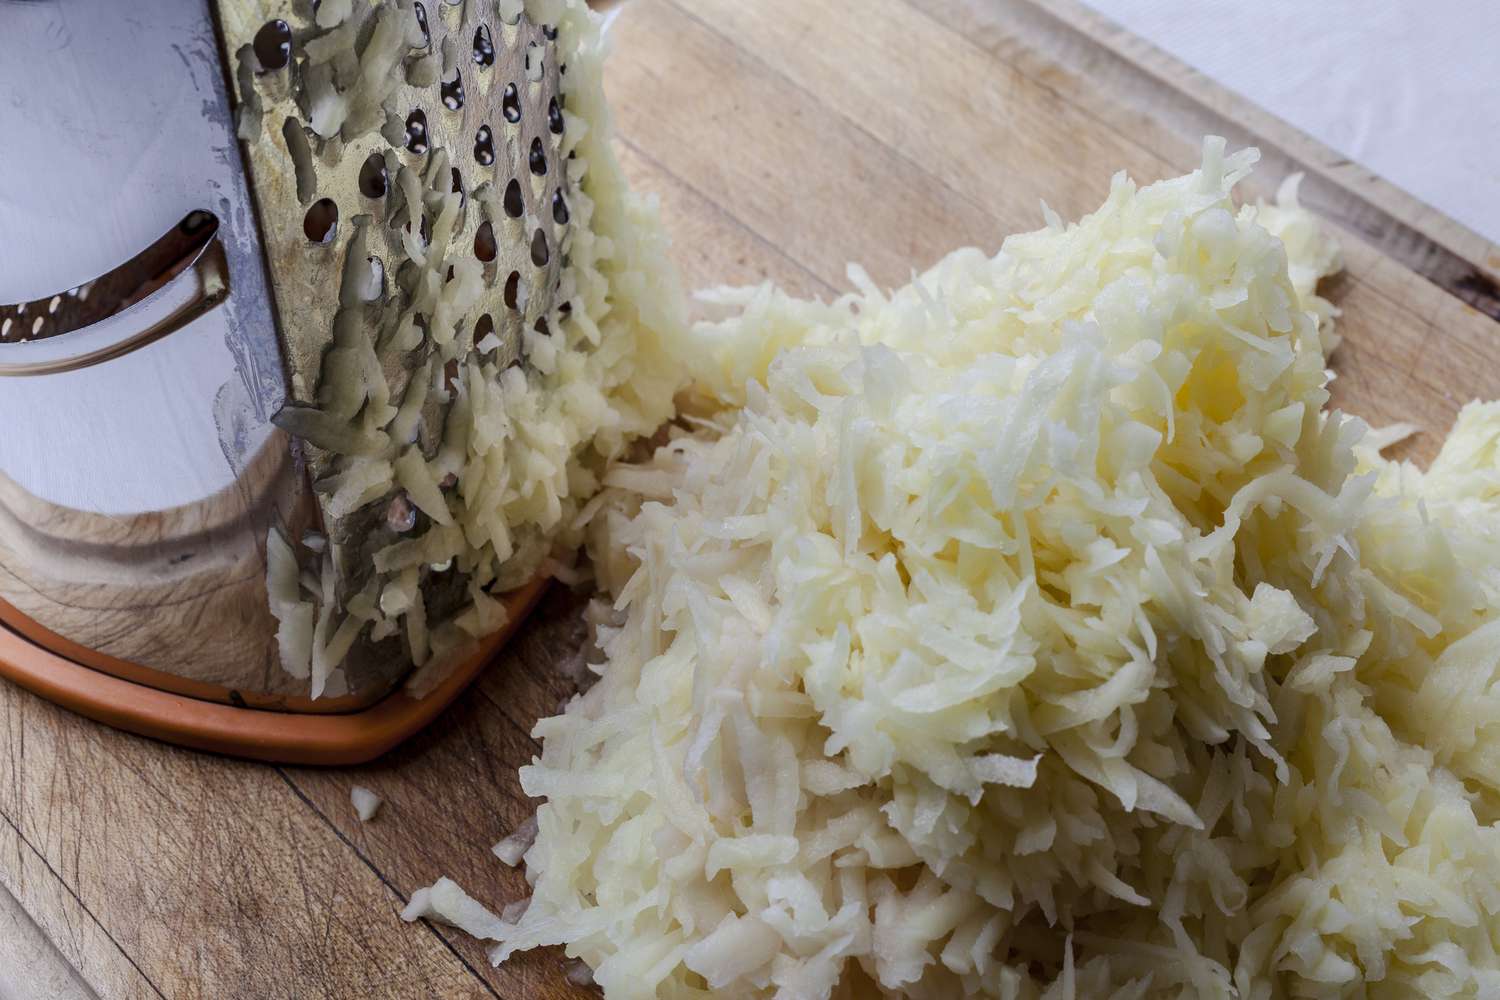
A great hash brown isn’t just about texture; it’s a balance of flavor and color too. The potato variety matters, the oil temperature is critical, and seasoning must be on point. But before any of that can happen, you need the right shred. Consistent shredding is the foundation of a successful hash brown, and that’s where the potato shredder comes in.
The tool you choose to shred your potatoes can dramatically impact the final product. A poorly chosen shredder can lead to uneven cooking, mushy results, or simply make the entire process far more laborious than necessary. This guide will explore the landscape of potato shredders, weighing the pros and cons of manual and electric options to help you achieve consistently crispy hash browns every time.

Manual Shredders: Classic Techniques
Manual shredding has been around for ages. Box graters, mandolines with shredding blades, and rotary graters are still good options because they're cheaper and give you more control.
The common box grater works well. Use the coarse side for hash browns; it balances crispiness and fluffiness. Getting consistent results takes effort, especially with firm potatoes. The fine side can turn potatoes into paste if you're not careful.
Mandolines with shredding blades give you a more uniform shred than box graters, which helps with even cooking. Be very careful with mandolines; the blades are sharp. Always use the hand guard.
Rotary graters (or drum graters) have a rotating drum. They're fast and easy but might not give you as much control as a box grater or mandoline. One Facebook user found a simple cheese grater worked well for small batches. Their method: grate potatoes, press out moisture, spray with oil, and cook at 375°F for 10-12 minutes.
The main drawback of manual shredders is the physical work. Shredding lots of potatoes by hand is tiring and takes longer than with electric models. Your technique and stamina determine how consistent the results are.
- Box Grater: Affordable, versatile, but requires effort and skill for consistent results.
- Mandoline: Offers uniform shredding, but safety is a concern.
- Rotary Grater: Quick and easy, but may lack control.
- Cheese Grater: A simple and effective option for smaller batches.
Electric Shredders: Speed and Consistency
Electric shredders offer speed and consistency, fixing the main issues with manual ones. They usually come as food processors with shredding discs or as dedicated electric shredders.
You can use a food processor with a shredding disc for potatoes. It's fast, usually giving good consistency, though this depends on the processor and blade. Cleaning can take a while with all the parts.
Dedicated electric shredders, designed just for shredding, are less common. They have a hopper for potatoes and an automatic mechanism. They're efficient but cost more than a food processor attachment.
Electric shredders are fast, cutting down prep time for large batches. But they cost more, need electricity, and take up storage space. For someone who only makes hash browns now and then, the expense might not be worth the time saved.
Be careful not to over-process potatoes with electric shredders; they can easily turn into puree. Watch the process closely and use pulse settings to avoid this.
- Food Processor: Versatile, fast, but can be cumbersome to clean.
- Dedicated Electric Shredder: Very efficient, but expensive and requires dedicated storage.
Featured Products

Fine shredding disc blade · Replacement part for specific Cuisinart models (DFP-11, DFP-7BC, DLC-10, DLC-2007N, DLC-2011, DLC-8) · Requires stem model DLC-839ATX-1
This is a replacement part for specific Cuisinart food processors, ensuring compatibility for fine shredding tasks.

4-cup capacity mini food processor · Includes slicing and shredding discs · 250-watt motor
This compact food processor offers dedicated shredding capabilities suitable for smaller batch preparation.

Electric coffee grinder · Stainless steel blades · Suitable for grinding beans and spices
While primarily a coffee grinder, its motor and blade design may offer basic shredding functionality for certain ingredients.

Food processor attachment for KitchenAid Stand Mixers · Includes a commercial food dicing disc · Offers shredding functionality
This attachment integrates with a KitchenAid stand mixer to provide robust shredding and dicing capabilities.

8-cup food processor · 450W motor · Includes S-blade for shredding, slicing, chopping, and pureeing
This food processor provides ample capacity and power for efficient shredding and other food preparation tasks.
As an Amazon Associate I earn from qualifying purchases. Prices may vary.
Shred Size and Hash Brown Texture
Shred size is key to hash brown texture. Finer shreds (from a box grater's fine side or a specific food processor disc) make denser, crispier hash browns because more surface area browns. But, finer shreds release more starch, which can make them gummy if not handled right.
Coarser shreds make fluffier, more rustic hash browns. Larger pieces hold more moisture and create air pockets during cooking for a lighter texture. The coarse side of a box grater works well for this style.
Shredders produce different sizes. Mandolines often have adjustable blades for thickness control. Food processors usually come with discs for specific sizes. Try different shredders and settings to find your preferred texture.
Serious Eats recommends a medium shred for their crispy hash browns recipe, using the medium holes of a box grater. They stress squeezing out excess moisture after shredding, no matter the size, to prevent steaming and ensure browning.
Hash Brown Texture & Shredder Performance Matrix
| Shred Size | Desired Texture | Cooking Time | Oil Absorption | Notes |
|---|---|---|---|---|
| Fine | Crispy, even browning | Shorter | Higher | Fine shreds maximize surface area, leading to quicker cooking and greater oil uptake. Requires careful monitoring to prevent burning. |
| Medium | Fluffy interior, moderately crispy exterior | Moderate | Moderate | A balance between surface area and potato structure. Generally considered ideal for classic hash browns. |
| Coarse | Rustic, chunky texture | Longer | Lower | Coarse shreds retain more potato structure, resulting in a chewier, less uniformly crispy hash brown. May require higher heat to achieve browning. |
| Very Fine (Box Grater - Small Holes) | Very Crispy, potentially dry | Shortest | Highest | As observed in user reports (facebook.com), very fine shreds can become overly brittle and absorb significant oil. |
| Medium-Coarse (Rotary Shredder) | Textured, slightly fluffy | Moderate to Long | Moderate | Offers a good compromise, providing some fluffiness while still allowing for browning. Consistent shred size is achievable with electric models. |
| Fine-Medium (Mandoline with Shredding Attachment) | Uniformly Crispy | Moderate | Moderate to High | Mandolines provide consistent shred size but require caution during use. Oil absorption can be higher depending on blade sharpness. |
Illustrative comparison based on the article research brief. Verify current pricing, limits, and product details in the official docs before relying on it.
Beyond Shredding: Essential Techniques
Beyond choosing the right shredder, other techniques are vital for crispy hash browns. The most important is removing excess moisture. Potatoes have a lot of water, and getting rid of it helps them brown and prevents sogginess.
Shredding releases starch, which can make hash browns gummy. Rinsing shredded potatoes in cold water removes some starch but also some flavor. Squeeze them thoroughly in a clean towel or cheesecloth after rinsing.
Use an oil with a high smoke point, like vegetable or canola oil, or clarified butter. Olive oil burns too easily. Use enough oil to coat the potatoes without making them greasy.
Cook at a high temperature, around 375°F (190°C), for a crispy exterior. Don't overcrowd the pan, or they'll steam instead of brown. Season after cooking so salt doesn't draw out moisture.
Electric vs. Manual: A Head-to-Head
Let’s directly compare the two main categories: electric and manual potato shredders. Electric shredders excel in speed and consistency, making them ideal for large batches or frequent hash brown makers. They require less physical effort and can significantly reduce prep time. However, they are more expensive, require electricity, and can be more difficult to clean.
Manual shredders, on the other hand, are affordable, portable, and require no electricity. They offer more control over the shred size and texture, but demand more physical effort and time. They are best suited for occasional hash brown makers or those who prefer a more hands-on approach.
Consider your cooking habits and priorities. If you make hash browns regularly and value speed and convenience, an electric shredder is a worthwhile investment. If you only make hash browns occasionally and don’t mind putting in a little effort, a manual shredder will suffice. The cost-benefit analysis depends entirely on your individual needs.
- Speed: Electric shredders are significantly faster.
- Consistency: Electric shredders generally produce more uniform shreds.
- Effort: Manual shredders require more physical effort.
- Cost: Manual shredders are much more affordable.
- Cleaning: Electric shredders can be more complex to clean.
Standout Shredders: 2026 Picks
After evaluating numerous options, here are three standout potato shredders for 2026, representing a range of price points and features.
OXO Good Grips V-Blade Mandoline Slicer (Manual): This mandoline consistently receives high ratings for its safety and ease of use. It features a V-blade that produces uniform shreds, and the hand guard provides excellent protection. While not solely a shredder, its shredding capability is top-notch. It’s priced around $60.
Cuisinart FP-13D Elemental 13-Cup Food Processor (Electric): This food processor is a versatile kitchen appliance that includes a shredding disc. It's powerful enough to handle large quantities of potatoes quickly and efficiently. The shredding disc produces a medium shred, ideal for classic hash browns. It typically retails for around $200.
Presto 02970 SaladShooter Electric Salad Spinner and Food Shredder (Electric): While marketed as a salad shooter, this appliance also excels at shredding potatoes. It’s quick, easy to clean, and relatively affordable, usually around $80. The resulting shred is slightly finer, making it suitable for extra-crispy hash browns. User reviews consistently praise its speed and convenience.
Featured Products

Four grating surfaces: coarse, fine, slicer, and ginger/garlic · Ergonomic, non-slip handle for secure grip · Removable non-slip base for stability
The OXO Good Grips Box Grater provides versatile manual shredding options with user-friendly design for consistent results.

Ultra-sharp stainless steel blade for efficient shredding · Non-slip base ensures stability during use · Dishwasher safe for convenient cleaning
The Kuhn Rikon Essential Medium Grater offers a sharp, durable manual shredding solution that is both effective and easy to maintain.

10-in-1 functionality including shredding and slicing · Multiple blade options for various cuts · Durable stainless steel construction
The Mueller Pro-Series Multi Vegetable Chopper offers extensive versatility for various kitchen tasks, including shredding, with its array of blades.

Attaches to KitchenAid Stand Mixers · Includes shredding and slicing blades · Designed for efficient food preparation
The KitchenAid Stand Mixer Attachment leverages the power of a stand mixer for automated and efficient shredding of potatoes.
As an Amazon Associate I earn from qualifying purchases. Prices may vary.


No comments yet. Be the first to share your thoughts!