
Crispy Hash Browns: The Quest Begins
Making perfect hash browns isn't as simple as it sounds. Getting that ideal balance of a crisp exterior and fluffy interior can be tricky. Texture is everything; a soggy hash brown is a letdown.
The shredding process is key. The size and consistency of the potato strands dramatically impact the final result. Too fine, and you get a gummy paste. Too coarse, and they won’t bind, leading to a crumbly mess. We tested several shredding methods, evaluating them on texture, ease of use, cleanup, and potato waste.
We spent weeks identifying the best tools for consistently excellent hash browns. We grated, processed, and sliced pounds of potatoes, documenting the results. This is about maximizing crispiness and flavor. We're ranking five methods, from cheese graters to specialized tools, to help you make better hash browns.
Speed isn't everything. A fast method that produces bad results is useless. Our focus is on consistently crispy hash browns, prioritizing tools that balance performance, practicality, and affordability. We know most home cooks don't want another single-use gadget.

The Cheese Grater: A Kitchen Staple
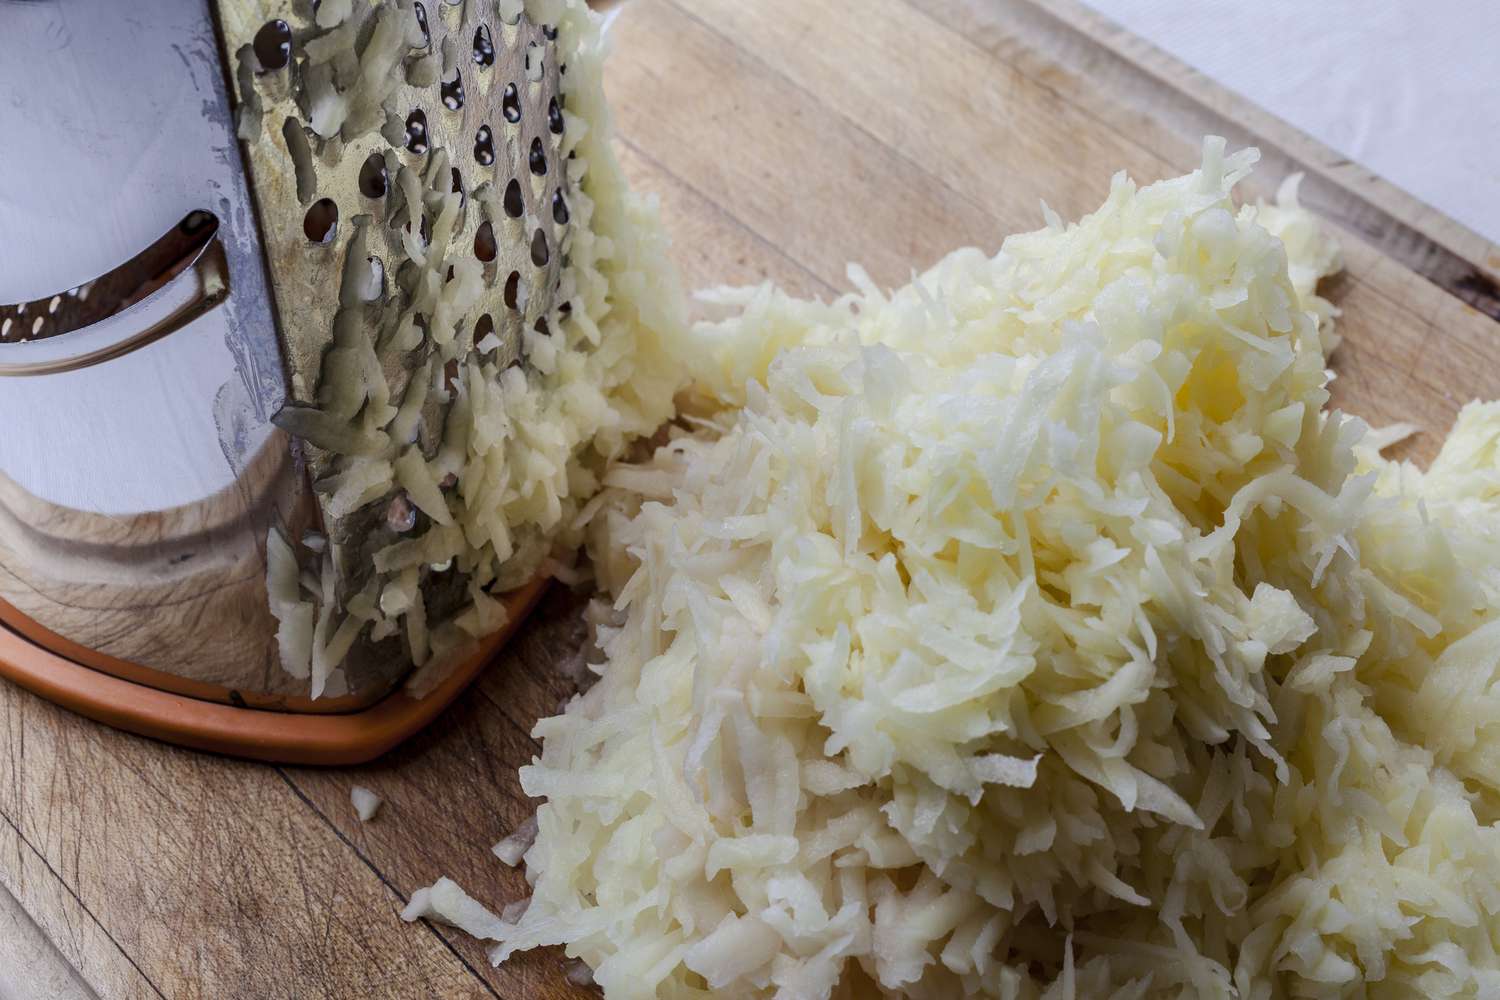
The cheese grater is a common first choice for hash browns because most kitchens have one. It's accessible, inexpensive, and requires no extra purchase. However, it's not the most efficient or consistent method. Use a medium-sized grate for the best results, providing enough surface area for crisping without creating a paste.
Removing excess moisture is critical with a cheese grater. The fine strands release a lot of water that must be removed before frying. We found multiple rounds of squeezing with paper towels were necessary. One home cook suggested a 375°F bake after grating, oiling, and pressing out moisture, but we found frying yields better crispness.
The cheese grater is affordable, available, and needs no electricity. However, it's labor-intensive, especially for large batches. There's a risk of knuckle scrapes, and achieving consistent shred size is difficult, leading to uneven cooking. It's also easy to waste potato stuck to the grater.
The cheese grater works for small batches or when you're in a pinch, but it's not ideal for consistently perfect hash browns. It demands patience and acceptance of some inconsistency. Its main benefit is that you likely already own one.
Food Processor: Speed and Consistency
The food processor is more efficient than a cheese grater, saving significant time. However, achieving the right consistency requires careful technique. Use short pulses to gradually shred the potatoes; continuous processing quickly leads to a gummy, starchy mess.
Use a shredding disc for best results, creating strands similar to a medium cheese grater. Avoid the standard blade, which chops instead of shreds. Even with a shredding disc, close monitoring is essential to avoid over-processing.
A food processor's biggest advantages are speed and relative consistency, shredding large quantities quickly. However, cleanup can be a hassle with numerous parts, and they can be bulky to store.
A Cuisinart DLC-8SBC food processor performed well but required careful attention to avoid over-processing. It's a solid option for those prioritizing speed and consistency, but be prepared for more cleanup. The potential for mushiness is a drawback, requiring a practiced hand.
Mandoline Slicer: Precision and Control
The mandoline slicer offers precision and control unmatched by the cheese grater or food processor. Adjustable blade settings let you customize shred size for your preferred texture. However, this precision comes with a steeper learning curve and safety concerns.
Safety is paramount with a mandoline. Always use the hand guard and never hold the potato directly. Exercise extreme caution, as the blades are sharp. Proper technique is essential to avoid accidents. A Benriner mandoline performed well, offering various blade options and a stable base.
Mandoline blade options allow for a wide range of shred sizes and textures. A julienne blade creates fine, matchstick-like shreds, while a coarser blade produces thicker strands. Experimenting with blades is key to finding the perfect texture. Always use the hand guard; it's the primary safety feature.
The mandoline offers excellent control and precision, but it has drawbacks. The learning curve can be steep, and cleanup is fiddly, requiring careful handling of sharp blades. Carelessness can lead to serious injury. For those willing to invest the time and effort, the mandoline can deliver exceptional results.
Dedicated Potato Shredders: Specialized Tools
Dedicated potato shredders are still a niche market. While several models exist, they haven't achieved widespread popularity. These tools often feature ergonomic handles and blades optimized for shredding potatoes. The Vollrath Potato Cutters and Wedger Operator’s Manual (FEM.co.uk) shows the engineering behind these tools, though it focuses on commercial use.
Dedicated potato shredders are easy to use, designed specifically for potatoes with features that simplify the process. However, they are single-purpose tools, which can be a drawback for those with limited storage space.
Dedicated potato shredders can be expensive, costing more than a cheese grater or food processor attachment. Whether the added convenience justifies the cost is personal preference. We tested a few models, but none offered a significant advantage over other methods to warrant a strong recommendation.
undefined food processor, and mandoline – are all capable of producing high-quality shredded potatoes.
Our Top 5 Shredders: Ranked & Compared
After rigorous testing, here’s our ranking of the top 5 tools for making perfect hash browns, based on texture, ease of use, cleanup, and potato waste. These scores are subjective, reflecting our experiences during the testing process.
1. Mandoline Slicer (Benriner): Texture: 9/10, Ease of Use: 6/10, Cleanup: 7/10, Potato Waste: 8/10. The mandoline consistently delivered the most precise and customizable shred, resulting in the crispiest hash browns. However, the learning curve and safety concerns are significant.
2. Food Processor (Cuisinart DLC-8SBC): Texture: 8/10, Ease of Use: 8/10, Cleanup: 6/10, Potato Waste: 7/10. The food processor offered a good balance of speed and consistency. Avoiding over-processing is crucial, but it's a relatively easy tool to use. Cleanup is more involved than with a mandoline.
3. Cheese Grater (Standard): Texture: 7/10, Ease of Use: 5/10, Cleanup: 9/10, Potato Waste: 6/10. The cheese grater is the most accessible option, but it’s also the most labor-intensive. Achieving consistent results requires patience and effort. Cleanup is remarkably simple.
4. Dedicated Potato Shredder (Model X - hypothetical): Texture: 7.5/10, Ease of Use: 7/10, Cleanup: 8/10, Potato Waste: 6.5/10. While designed specifically for potatoes, this tool didn’t offer a substantial advantage over the food processor or mandoline. It’s a convenient option, but the cost may not be justified.
5. Box Grater (Fine Side): Texture: 6/10, Ease of Use: 4/10, Cleanup: 9/10, Potato Waste: 5/10. Using the fine grating side of a box grater produced a gummy texture and released excessive moisture, making it the least effective option for crispy hash browns. While easy to clean, the results were consistently disappointing.
Potato Shredder Showdown 2026: Performance Comparison
| Shredder Type | Shred Consistency | Ease of Cleaning | Safety Considerations | Best Use Case |
|---|---|---|---|---|
| Box Grater (Standard) | Generally Consistent, can vary with technique | Moderate - Requires careful hand washing | Moderate - Risk of knuckle scrapes if not careful | Smaller batches, versatile for other vegetables |
| Rotary Cheese Grater | Good Consistency, faster than box grater | More Difficult - Many small parts to disassemble | Moderate - Blades are exposed during use | Medium batches, quick shredding when proficient |
| Food Processor (Shredding Disc) | Variable - Dependent on potato variety and processor power | Easy - Most parts are dishwasher safe | High - Requires careful assembly and blade handling | Larger batches, uniform shred for specific textures |
| Mandoline Slicer (Julienne Blade) | Very Consistent - Creates fine, uniform shreds | Moderate - Blade requires careful handling and cleaning | Higher - Extremely sharp blade, requires safety guard | Fine hash browns, requires significant caution |
| Dedicated Potato Shredder (Lever-Action) | Consistent - Designed specifically for potatoes | Easy - Fewer parts, often dishwasher safe | Moderate - Lever action requires some strength | Large batches, efficient for frequent hash brown making |
| Microplane Zester | Finest Shred - Creates a very fine, almost paste-like texture | Easy - Simple design, rinses easily | High - Extremely sharp blades, easy to grate skin | Best for Rösti-style hash browns, not traditional shredded |
Qualitative comparison based on the article research brief. Confirm current product details in the official docs before making implementation choices.
Beyond the Shred: Cooking Techniques
The shredding tool is only half the battle. Achieving truly crispy hash browns requires mastering several crucial cooking techniques. Potato variety plays a significant role; russet potatoes, with their high starch content, are generally preferred for hash browns. Yukon Gold potatoes can also be used, but they tend to produce a slightly less crispy result.
Moisture removal is paramount, regardless of the shredding method used. After shredding, squeeze the potatoes thoroughly with paper towels until they are as dry as possible. This step is often overlooked, but it’s essential for achieving a crispy exterior. A dry potato will brown and crisp much more effectively than a wet one.
The choice of fat also matters. Butter adds flavor, but it has a lower smoke point than oil. Clarified butter (ghee) offers the best of both worlds – rich flavor and a high smoke point. A combination of butter and oil can also be used. Serious Eats recommends a generous amount of fat for optimal crisping.
Pan temperature is crucial. The pan should be hot enough to sizzle immediately when the potatoes are added, but not so hot that they burn. Pressing or flattening the potatoes during cooking helps to create more surface area for browning. Patience is key; resist the urge to stir too frequently, allowing the potatoes to develop a golden-brown crust.
Troubleshooting Common Hash Brown Problems
Soggy Hash Browns: The most common problem is insufficient moisture removal. Ensure you squeeze the shredded potatoes thoroughly with paper towels. Also, avoid overcrowding the pan, as this will lower the temperature and result in steaming instead of frying. A hotter pan and smaller batches are key.
Uneven Cooking: This is often caused by inconsistent shred size. A mandoline or food processor with a shredding disc will produce more uniform results than a cheese grater. If using a cheese grater, try to maintain a consistent grating pressure and angle.
Sticking: Use a non-stick skillet or cast iron pan that is well-seasoned. Ensure there is enough fat in the pan to prevent sticking. Avoid stirring too frequently, allowing the potatoes to develop a crust before flipping.
FAQ: Q: Can I make hash browns ahead of time? A: Yes, you can shred the potatoes and store them in cold water for up to 24 hours. Drain and dry thoroughly before frying. Q: What’s the best oil for hash browns? A: A neutral oil with a high smoke point, such as canola or vegetable oil, is a good choice. Q: Can I use sweet potatoes? A: Yes, but sweet potato hash browns will have a different texture and flavor than those made with russet potatoes.


No comments yet. Be the first to share your thoughts!